
上篇文章 《Kubelet 创建 pod 工作流程》 讲解了 kubelet 如何创建 pod,各组件之间如何协作。基于上一篇文章,本文会讲解 kubelet 如何对 Pod 进行服务质量管理。
Pod QoS
Kubernetes 对每个 Pod 都设有 QoS 类型,通过这个 QoS 类型来对 Pod 进行服务质量管理。一共分为以下三类,优先级依次递减:
- Guaranteed:Pod 里每个容器都必须设定 request 和 limit,并且值必须相同;
- Burstable:Pod 里至少有一个容器设置了 cpu 或者 memory 的 request 值;
- BestEffort:Pod 的所有容器都没有指定 cpu 和内存的 requests 和 limits;
当机器资源不足时,kubelet 会根据 Pod 的 QoS 等级进行不公平对待。对于可抢占资源,比如 CPU,资源紧俏时,会按照请求的比例分配时间片,而如果达到 Pod 的 CPU 资源 limit 上限,CPU 会减速;而对于不可抢占资源,比如内存和磁盘,资源紧俏时,会按照 QoS 等级驱逐或者 OOMKill pod。
Cgroups
Cgroups 是 Control Groups 的缩写,是 Linux 内核提供的一种可以限制、记录、隔离进程组 (process groups) 所使用的物理资源 (如 cpu、memory、i/o 等等) 的机制。
cgroups 结构体就用来表示一个 control groups 对某一个或者某几个 cgroups 子系统的资源限制。通常可以组织成一颗树,每一棵 cgroups 结构体组成的树称之为一个 cgroups 层级结构。cgroups 层级结构可以 attach 一个或者几个 cgroups 子系统,当前层级结构可以对其 attach 的 cgroups 子系统进行资源的限制;每一个 cgroups 子系统只能被 attach 到一个 cpu 层级结构中。
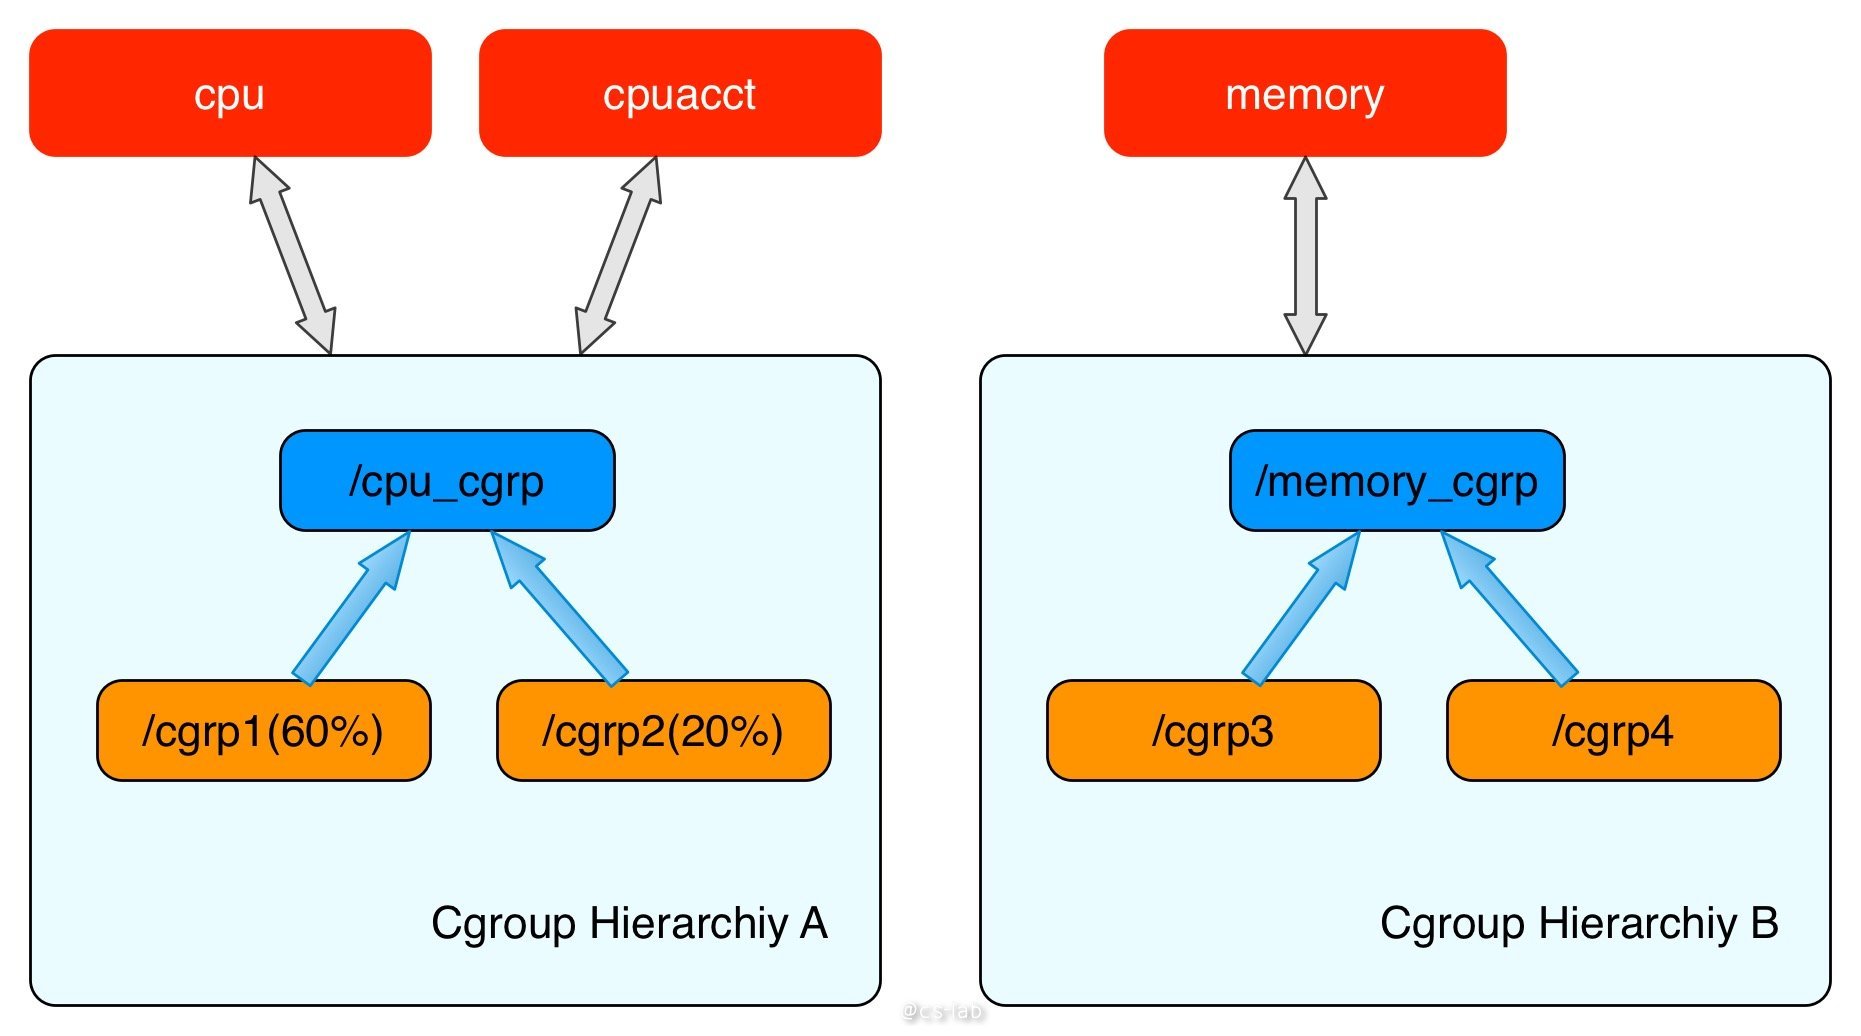
其中,cpu 子系统限制进程对 CPU 的访问,每个参数独立存在于 cgroups 虚拟文件系统的伪文件中,参数解释如下:
| key | desc |
|---|---|
| cpu.shares | cgroup对时间的分配。比如cgroup A设置的是 100,cgroup B设置的是 200,那么B中的任务获取cpu的时间,是A中任务的2倍。 |
| cpu.cfs_period_us | 完全公平调度器的调整时间配额的周期。 |
| cpu.cfs_quota_us | 完全公平调度器的周期当中可以占用的时间。 |
| cpu.stat | cpu 运行统计值 |
K8s 中的 Cgroups
在 kubernetes 中为了限制容器资源的使用,避免容器之间争抢资源或者容器影响所在的宿主机,kubelet 组件需要使用 cgroups 限制容器资源的使用量,cgroups 目前支持对进程多种资源的限制,而 kubelet 只支持限制 cpu、memory、pids、hugetlb 几种资源。
kubelet 启动后,会解析节点上的 root cgroups,然后在其下面创建一个叫做 kubepods 的子 cgroups。在 kubepods 下面创建三层 cgroups 文件树:
- QoS 级别:两个 QoS 级别 cgroups,名字分别叫做 Burstable 和 BestEffort,这两个 QoS 级别的 cgroups 是作为各自 QoS 级别的所有 Pod 的父 cgroup 来存在的
- pod 级别:创建 pod 时,需要在 pod 对应的 QoS cgroups 下创建 pod level cgroups。对于 Guaranteed Qos 对应的 pod 会直接在 kubepods 同级的 cgroups 中创建 pod cgroups。
- container 级别:创建 pod 内的具体container时,pod 级别 cgroups 继续创建对应的 container 级别 cgroups。
解析根 Cgroups
先来看看 kubelet 如何解析根组 Cgroups。
kubelet 管理 pod QoS 等级是通过组件 qosContainerManager,该组件是组件 containerManager 的成员,在构造 containerManager 的时候构造 qosContainerManager,看下代码:
👉 点击查看源码
func NewContainerManager(mountUtil mount.Interface, cadvisorInterface cadvisor.Interface, nodeConfig NodeConfig, failSwapOn bool, devicePluginEnabled bool, recorder record.EventRecorder) (ContainerManager, error) {
   ...

	cgroupRoot := ParseCgroupfsToCgroupName(nodeConfig.CgroupRoot)
	cgroupManager := NewCgroupManager(subsystems, nodeConfig.CgroupDriver)

	if nodeConfig.CgroupsPerQOS {
		if nodeConfig.CgroupRoot == "" {
			return nil, fmt.Errorf("invalid configuration: cgroups-per-qos was specified and cgroup-root was not specified. To enable the QoS cgroup hierarchy you need to specify a valid cgroup-root")
		}

		if !cgroupManager.Exists(cgroupRoot) {
			return nil, fmt.Errorf("invalid configuration: cgroup-root %q doesn't exist", cgroupRoot)
		}
		klog.Infof("container manager verified user specified cgroup-root exists: %v", cgroupRoot)

		cgroupRoot = NewCgroupName(cgroupRoot, defaultNodeAllocatableCgroupName)
	}
	klog.Infof("Creating Container Manager object based on Node Config: %+v", nodeConfig)

	qosContainerManager, err := NewQOSContainerManager(subsystems, cgroupRoot, nodeConfig, cgroupManager)
	if err != nil {
		return nil, err
	}
  ...
}
在构造 qosContainerManager 之前,会先将 kubelet 管理的 pod cgroup 根目录组建好,传入构造函数中,即 <rootCgroup>/kubepods。
构造完毕后,containerManager 启动的时候,会初始化并启动所有的子组件,其中就包括 qosContainerManager,启动 qosContainerManager 的方式是调用 setupNode 函数:
👉 点击查看源码
func (cm *containerManagerImpl) Start(node *v1.Node,
	activePods ActivePodsFunc,
	sourcesReady config.SourcesReady,
	podStatusProvider status.PodStatusProvider,
	runtimeService internalapi.RuntimeService) error {
	...
	// cache the node Info including resource capacity and
	// allocatable of the node
	cm.nodeInfo = node

	if utilfeature.DefaultFeatureGate.Enabled(kubefeatures.LocalStorageCapacityIsolation) {
		rootfs, err := cm.cadvisorInterface.RootFsInfo()
		if err != nil {
			return fmt.Errorf("failed to get rootfs info: %v", err)
		}
		for rName, rCap := range cadvisor.EphemeralStorageCapacityFromFsInfo(rootfs) {
			cm.capacity[rName] = rCap
		}
	}
	// Ensure that node allocatable configuration is valid.
	if err := cm.validateNodeAllocatable(); err != nil {
		return err
	}
	// Setup the node
	if err := cm.setupNode(activePods); err != nil {
		return err
	}
    ...
	return nil
}
在 setupNode 函数中,会调用 createNodeAllocatableCgroups 函数来解析节点的根 cgroups,然后启动 qosContainerManager。
👉 点击查看源码
func (cm *containerManagerImpl) setupNode(activePods ActivePodsFunc) error {
  ...
	// Setup top level qos containers only if CgroupsPerQOS flag is specified as true
	if cm.NodeConfig.CgroupsPerQOS {
		if err := cm.createNodeAllocatableCgroups(); err != nil {
			return err
		}
		err = cm.qosContainerManager.Start(cm.getNodeAllocatableAbsolute, activePods)
		if err != nil {
			return fmt.Errorf("failed to initialize top level QOS containers: %v", err)
		}
	}
	...
}
最后我们仔细看下 createNodeAllocatableCgroups 这个函数,探究一下 kubelet 如何解析节点的根 cgroups:
👉 点击查看源码
func (cm *containerManagerImpl) createNodeAllocatableCgroups() error {
	nodeAllocatable := cm.internalCapacity
	// Use Node Allocatable limits instead of capacity if the user requested enforcing node allocatable.
	nc := cm.NodeConfig.NodeAllocatableConfig
	if cm.CgroupsPerQOS && nc.EnforceNodeAllocatable.Has(kubetypes.NodeAllocatableEnforcementKey) {
		nodeAllocatable = cm.getNodeAllocatableInternalAbsolute()
	}

	cgroupConfig := &CgroupConfig{
		Name: cm.cgroupRoot,
		// The default limits for cpu shares can be very low which can lead to CPU starvation for pods.
		ResourceParameters: getCgroupConfig(nodeAllocatable),
	}
	if cm.cgroupManager.Exists(cgroupConfig.Name) {
		return nil
	}
	if err := cm.cgroupManager.Create(cgroupConfig); err != nil {
		klog.Errorf("Failed to create %q cgroup", cm.cgroupRoot)
		return err
	}
	return nil
}

func getCgroupConfig(rl v1.ResourceList) *ResourceConfig {
	// TODO(vishh): Set CPU Quota if necessary.
	if rl == nil {
		return nil
	}
	var rc ResourceConfig
	if q, exists := rl[v1.ResourceMemory]; exists {
		// Memory is defined in bytes.
		val := q.Value()
		rc.Memory = &val
	}
	if q, exists := rl[v1.ResourceCPU]; exists {
		// CPU is defined in milli-cores.
		val := MilliCPUToShares(q.MilliValue())
		rc.CpuShares = &val
	}
	if q, exists := rl[pidlimit.PIDs]; exists {
		val := q.Value()
		rc.PidsLimit = &val
	}
	rc.HugePageLimit = HugePageLimits(rl)

	return &rc
}
可以看到,createNodeAllocatableCgroups 函数本质就是根据 cm.internalCapacity 所获得的节点可用的 cpu、内存、Pid、HugePageLimits 等信息进行根组 Cgroup 的设置,这里面设置了 memory limit、cpu share、Pid limit 和 hugePageLimit 四个资源限制。根组 cgroup 的 name 就是构建 qosContainerManager 之前的时候传进来的 kubepods 目录。
其中 cm.internalCapacity 是在 containerManager 初始化的时候通过 CAdvisor 获取的;当用户使用 Node Allocatable 特性时,根据用户填入的参数来设置节点预留资源。
Qos 级别的 cgroups
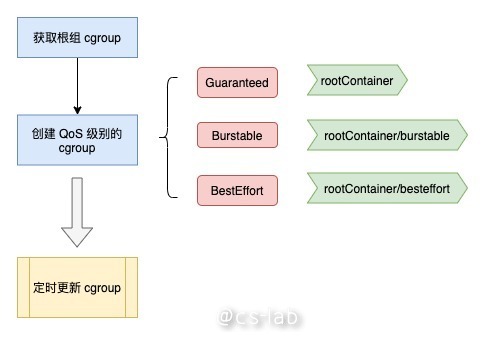
根组 Cgroups 设置好之后,再来看看 qosContainerManager 的启动函数。
如下图所示,首先会获取根组 cgroup (路径为
然后创建 QoS 级别的 cgroup,其中 Guaranteed 类型 cgroup 路径就是根组;Burstable 类型 cgroup 路径为
最后,起一个协程,定时执行 UpdateCgroups 函数,根据每个 QoS 类型的 pod 情况同步对应的 cgroup。
源码如下:
👉 点击查看源码
func (m *qosContainerManagerImpl) Start(getNodeAllocatable func() v1.ResourceList, activePods ActivePodsFunc) error {
	cm := m.cgroupManager
	rootContainer := m.cgroupRoot
	if !cm.Exists(rootContainer) {
		return fmt.Errorf("root container %v doesn't exist", rootContainer)
	}

	// Top level for Qos containers are created only for Burstable
	// and Best Effort classes
	qosClasses := map[v1.PodQOSClass]CgroupName{
		v1.PodQOSBurstable:  NewCgroupName(rootContainer, strings.ToLower(string(v1.PodQOSBurstable))),
		v1.PodQOSBestEffort: NewCgroupName(rootContainer, strings.ToLower(string(v1.PodQOSBestEffort))),
	}

	// Create containers for both qos classes
	for qosClass, containerName := range qosClasses {
		resourceParameters := &ResourceConfig{}
		// the BestEffort QoS class has a statically configured minShares value
		if qosClass == v1.PodQOSBestEffort {
			minShares := uint64(MinShares)
			resourceParameters.CpuShares = &minShares
		}

		// containerConfig object stores the cgroup specifications
		containerConfig := &CgroupConfig{
			Name:               containerName,
			ResourceParameters: resourceParameters,
		}

		// for each enumerated huge page size, the qos tiers are unbounded
		m.setHugePagesUnbounded(containerConfig)

		// check if it exists
		if !cm.Exists(containerName) {
			if err := cm.Create(containerConfig); err != nil {
				return fmt.Errorf("failed to create top level %v QOS cgroup : %v", qosClass, err)
			}
		} else {
			// to ensure we actually have the right state, we update the config on startup
			if err := cm.Update(containerConfig); err != nil {
				return fmt.Errorf("failed to update top level %v QOS cgroup : %v", qosClass, err)
			}
		}
	}
	// Store the top level qos container names
	m.qosContainersInfo = QOSContainersInfo{
		Guaranteed: rootContainer,
		Burstable:  qosClasses[v1.PodQOSBurstable],
		BestEffort: qosClasses[v1.PodQOSBestEffort],
	}
	m.getNodeAllocatable = getNodeAllocatable
	m.activePods = activePods

	// update qos cgroup tiers on startup and in periodic intervals
	// to ensure desired state is in sync with actual state.
	go wait.Until(func() {
		err := m.UpdateCgroups()
		if err != nil {
			klog.Warningf("[ContainerManager] Failed to reserve QoS requests: %v", err)
		}
	}, periodicQOSCgroupUpdateInterval, wait.NeverStop)

	return nil
}
再看下 UpdateCgroups 的内容。
首先,对于 BestEffort 和 Burstable 的两类 qos,重新计算 cpushare 值。规则是 BestEffort 类型的 cpushare 设置为 2;Burstable 类型的 cpushare 为其下所有 pod 的 cpushare 总和。
其次,如果开启了内存大页,则设置 huge page 相关 cgroup。
然后,如果开启了 qos reserve,则针对 Burstable 和 BestEffort 两类 QoS,计算memory limit。规则是,Burstable 的 memory limit 为节点总量减去 Guaranteed pod 的 memory limit 总和;BestEffort 的 memory limit 为 Burstable 的 memory limit 减去 Burstable pod 的 memory limit 总和。计算公式如下:
burstableLimit := allocatable - (qosMemoryRequests[v1.PodQOSGuaranteed] * percentReserve / 100)
bestEffortLimit := burstableLimit - (qosMemoryRequests[v1.PodQOSBurstable] * percentReserve / 100)
其中,qos-reserved 这个参数的使用场景为:在某些场景下我们希望能够尽可能保证 Guaranteed pod 这种高级别 pod 的资源,尤其是不可抢占资源(如内存),不要被低 级别的 pod 抢占,此时就可以使用 --qos-reserved 为高级别 pod 进行预留资源。所以 Burstable 的 cgroup 需要为比他等级高的 Guaranteed pod 的内存资源做预留,而 BestEffort 需要为 Burstable 和 Guaranteed 都要预留内存资源。
最后,将新的数据更新写入 QoS 级别的 cgroup 数据。整体代码如下:
👉 点击查看源码
func (m *qosContainerManagerImpl) UpdateCgroups() error {
	m.Lock()
	defer m.Unlock()

	qosConfigs := map[v1.PodQOSClass]*CgroupConfig{
		v1.PodQOSBurstable: {
			Name:               m.qosContainersInfo.Burstable,
			ResourceParameters: &ResourceConfig{},
		},
		v1.PodQOSBestEffort: {
			Name:               m.qosContainersInfo.BestEffort,
			ResourceParameters: &ResourceConfig{},
		},
	}

	// update the qos level cgroup settings for cpu shares
	if err := m.setCPUCgroupConfig(qosConfigs); err != nil {
		return err
	}

	// update the qos level cgroup settings for huge pages (ensure they remain unbounded)
	if err := m.setHugePagesConfig(qosConfigs); err != nil {
		return err
	}

	if utilfeature.DefaultFeatureGate.Enabled(kubefeatures.QOSReserved) {
		for resource, percentReserve := range m.qosReserved {
			switch resource {
			case v1.ResourceMemory:
				m.setMemoryReserve(qosConfigs, percentReserve)
			}
		}

		updateSuccess := true
		for _, config := range qosConfigs {
			err := m.cgroupManager.Update(config)
			if err != nil {
				updateSuccess = false
			}
		}
		...
	}

	for _, config := range qosConfigs {
		err := m.cgroupManager.Update(config)
		if err != nil {
			klog.Errorf("[ContainerManager]: Failed to update QoS cgroup configuration")
			return err
		}
	}
   ...
	return nil
}
在 cgroupManager.Update() 中,根据上面计算所得的所有 cgroup,调用 runc 进行 cgroup 写入,支持的 cgroupfs 包括了 MemoryGroup、CpuGroup、PidsGroup,均在包 "github.com/opencontainers/runc/libcontainer/cgroups/fs" 中,源码如下:
👉 点击查看源码
func setSupportedSubsystemsV1(cgroupConfig *libcontainerconfigs.Cgroup) error {
	for sys, required := range getSupportedSubsystems() {
		if _, ok := cgroupConfig.Paths[sys.Name()]; !ok {
			if required {
				return fmt.Errorf("failed to find subsystem mount for required subsystem: %v", sys.Name())
			}
			...
			continue
		}
		if err := sys.Set(cgroupConfig.Paths[sys.Name()], cgroupConfig); err != nil {
			return fmt.Errorf("failed to set config for supported subsystems : %v", err)
		}
	}
	return nil
}

func getSupportedSubsystems() map[subsystem]bool {
	supportedSubsystems := map[subsystem]bool{
		&cgroupfs.MemoryGroup{}: true,
		&cgroupfs.CpuGroup{}:    true,
		&cgroupfs.PidsGroup{}:   false,
	}
	// not all hosts support hugetlb cgroup, and in the absent of hugetlb, we will fail silently by reporting no capacity.
	supportedSubsystems[&cgroupfs.HugetlbGroup{}] = false
	if utilfeature.DefaultFeatureGate.Enabled(kubefeatures.SupportPodPidsLimit) || utilfeature.DefaultFeatureGate.Enabled(kubefeatures.SupportNodePidsLimit) {
		supportedSubsystems[&cgroupfs.PidsGroup{}] = true
	}
	return supportedSubsystems
}
拿 cpuGroup 举例,本质就是写入 cpu.shares、cpu.cfs_period_us、cpu.cfs_quota_us 文件。源码如下:
👉 点击查看源码
func (s *CpuGroup) Set(path string, cgroup *configs.Cgroup) error {
	if cgroup.Resources.CpuShares != 0 {
		shares := cgroup.Resources.CpuShares
		if err := fscommon.WriteFile(path, "cpu.shares", strconv.FormatUint(shares, 10)); err != nil {
			return err
		}
		...
	}
	if cgroup.Resources.CpuPeriod != 0 {
		if err := fscommon.WriteFile(path, "cpu.cfs_period_us", strconv.FormatUint(cgroup.Resources.CpuPeriod, 10)); err != nil {
			return err
		}
	}
	if cgroup.Resources.CpuQuota != 0 {
		if err := fscommon.WriteFile(path, "cpu.cfs_quota_us", strconv.FormatInt(cgroup.Resources.CpuQuota, 10)); err != nil {
			return err
		}
	}
	return s.SetRtSched(path, cgroup)
}
pod 级别的 cgroups
下面来看下 pod 级别的 cgroup 创建过程。
在创建 pod 的时候,syncPod 函数会调用 podContainerManagerImpl 结构体里面的 EnsureExists 方法,该方法会检测 pod 是否已存在,若不存在,会调用 ResourceConfigForPod 函数计算出该 pod 的 resource,再创建出其对应的 cgroup。源码如下:
👉 点击查看源码
func (m *podContainerManagerImpl) EnsureExists(pod *v1.Pod) error {
	podContainerName, _ := m.GetPodContainerName(pod)
	// check if container already exist
	alreadyExists := m.Exists(pod)
	if !alreadyExists {
		// Create the pod container
		containerConfig := &CgroupConfig{
			Name:               podContainerName,
			ResourceParameters: ResourceConfigForPod(pod, m.enforceCPULimits, m.cpuCFSQuotaPeriod),
		}
		if utilfeature.DefaultFeatureGate.Enabled(kubefeatures.SupportPodPidsLimit) && m.podPidsLimit > 0 {
			containerConfig.ResourceParameters.PidsLimit = &m.podPidsLimit
		}
		if err := m.cgroupManager.Create(containerConfig); err != nil {
			return fmt.Errorf("failed to create container for %v : %v", podContainerName, err)
		}
	}

	if err := m.applyLimits(pod); err != nil {
		return fmt.Errorf("failed to apply resource limits on container for %v : %v", podContainerName, err)
	}
	return nil
}
我们接着来看看 kubelet 如何计算 pod 的 resource。
首先,将 pod 的所有 container 中的 cpu request/limits 和 memory limit 统计出来,cpu request/limits 转换成 cpuShares、cpuQuota;计算出大页 limit;再根据每个 container 的 resource 声明,判断是哪种 QoS;最后再统计 pod 的 cgroup:
- 若 enforceCPULimits 未开启,cpuQuota 为 -1;
- 若 pod 为 Guaranteed 类型,CpuShares、CpuQuota、CpuPeriod、Memory 均为前面计算所得;
- 若 pod 为 Burstable 类型,只有 cpuLimitsDeclared 开启,才配置 CpuQuota 和 CpuPeriod,只有 memoryLimitsDeclared 开启,才配置 Memory;
- 若 pod 为 BestEffort 类型,CpuShares 为 2,其他均不设置。
源码如下:
👉 点击查看源码
func ResourceConfigForPod(pod *v1.Pod, enforceCPULimits bool, cpuPeriod uint64) *ResourceConfig {
	// sum requests and limits.
	reqs, limits := resource.PodRequestsAndLimits(pod)

	cpuRequests := int64(0)
	cpuLimits := int64(0)
	memoryLimits := int64(0)
	if request, found := reqs[v1.ResourceCPU]; found {
		cpuRequests = request.MilliValue()
	}
	if limit, found := limits[v1.ResourceCPU]; found {
		cpuLimits = limit.MilliValue()
	}
	if limit, found := limits[v1.ResourceMemory]; found {
		memoryLimits = limit.Value()
	}

	// convert to CFS values
	cpuShares := MilliCPUToShares(cpuRequests)
	cpuQuota := MilliCPUToQuota(cpuLimits, int64(cpuPeriod))

	// track if limits were applied for each resource.
	memoryLimitsDeclared := true
	cpuLimitsDeclared := true
	// map hugepage pagesize (bytes) to limits (bytes)
	hugePageLimits := map[int64]int64{}
	for _, container := range pod.Spec.Containers {
		if container.Resources.Limits.Cpu().IsZero() {
			cpuLimitsDeclared = false
		}
		if container.Resources.Limits.Memory().IsZero() {
			memoryLimitsDeclared = false
		}
		containerHugePageLimits := HugePageLimits(container.Resources.Requests)
		for k, v := range containerHugePageLimits {
			if value, exists := hugePageLimits[k]; exists {
				hugePageLimits[k] = value + v
			} else {
				hugePageLimits[k] = v
			}
		}
	}

	// quota is not capped when cfs quota is disabled
	if !enforceCPULimits {
		cpuQuota = int64(-1)
	}

	// determine the qos class
	qosClass := v1qos.GetPodQOS(pod)

	// build the result
	result := &ResourceConfig{}
	if qosClass == v1.PodQOSGuaranteed {
		result.CpuShares = &cpuShares
		result.CpuQuota = &cpuQuota
		result.CpuPeriod = &cpuPeriod
		result.Memory = &memoryLimits
	} else if qosClass == v1.PodQOSBurstable {
		result.CpuShares = &cpuShares
		if cpuLimitsDeclared {
			result.CpuQuota = &cpuQuota
			result.CpuPeriod = &cpuPeriod
		}
		if memoryLimitsDeclared {
			result.Memory = &memoryLimits
		}
	} else {
		shares := uint64(MinShares)
		result.CpuShares = &shares
	}
	result.HugePageLimit = hugePageLimits
	return result
}
container 级别的 cgroups
最后再来看看 container 级别的 cgroup。
container 在创建的时候,会先获取其父 cgroup,即 pod 级别的 cgroup,存放在 podSandboxConfig 中,然后会调用 generateContainerConfig 生成容器级别的各类 cgroup 信息,源码如下:
👉 点击查看源码
func (m *kubeGenericRuntimeManager) startContainer(podSandboxID string, podSandboxConfig *runtimeapi.PodSandboxConfig, spec *startSpec, pod *v1.Pod, podStatus *kubecontainer.PodStatus, pullSecrets []v1.Secret, podIP string, podIPs []string) (string, error) {
	container := spec.container
	...
	containerConfig, cleanupAction, err := m.generateContainerConfig(container, pod, restartCount, podIP, imageRef, podIPs, target)
	if cleanupAction != nil {
		defer cleanupAction()
	}
	...
	containerID, err := m.runtimeService.CreateContainer(podSandboxID, containerConfig, podSandboxConfig)
	if err != nil {
		s, _ := grpcstatus.FromError(err)
		m.recordContainerEvent(pod, container, containerID, v1.EventTypeWarning, events.FailedToCreateContainer, "Error: %v", s.Message())
		return s.Message(), ErrCreateContainer
	}
	...
	return "", nil
}
再来看下生成 containerConfig 的代码,其实这部分很简单,就是通过 container 中的 resources 生成容器的所有 cgroup 信息,源码如下:
👉 点击查看源码
func (m *kubeGenericRuntimeManager) generateContainerConfig(container *v1.Container, pod *v1.Pod, restartCount int, podIP, imageRef string, podIPs []string, nsTarget *kubecontainer.ContainerID) (*runtimeapi.ContainerConfig, func(), error) {
	opts, cleanupAction, err := m.runtimeHelper.GenerateRunContainerOptions(pod, container, podIP, podIPs)
	...
	config := &runtimeapi.ContainerConfig{
		Metadata: &runtimeapi.ContainerMetadata{
			Name:    container.Name,
			Attempt: restartCountUint32,
		},
		Image:       &runtimeapi.ImageSpec{Image: imageRef},
		Command:     command,
		Args:        args,
		WorkingDir:  container.WorkingDir,
		Labels:      newContainerLabels(container, pod),
		Annotations: newContainerAnnotations(container, pod, restartCount, opts),
		Devices:     makeDevices(opts),
		Mounts:      m.makeMounts(opts, container),
		LogPath:     containerLogsPath,
		Stdin:       container.Stdin,
		StdinOnce:   container.StdinOnce,
		Tty:         container.TTY,
	}

	// set platform specific configurations.
	if err := m.applyPlatformSpecificContainerConfig(config, container, pod, uid, username, nsTarget); err != nil {
		return nil, cleanupAction, err
	}
	...
	return config, cleanupAction, nil
}

func (m *kubeGenericRuntimeManager) applyPlatformSpecificContainerConfig(config *runtimeapi.ContainerConfig, container *v1.Container, pod *v1.Pod, uid *int64, username string, nsTarget *kubecontainer.ContainerID) error {
	config.Linux = m.generateLinuxContainerConfig(container, pod, uid, username, nsTarget)
	return nil
}

func (m *kubeGenericRuntimeManager) generateLinuxContainerConfig(container *v1.Container, pod *v1.Pod, uid *int64, username string, nsTarget *kubecontainer.ContainerID) *runtimeapi.LinuxContainerConfig {
	lc := &runtimeapi.LinuxContainerConfig{
		Resources:       &runtimeapi.LinuxContainerResources{},
		SecurityContext: m.determineEffectiveSecurityContext(pod, container, uid, username),
	}
	...
	// set linux container resources
	var cpuShares int64
	cpuRequest := container.Resources.Requests.Cpu()
	cpuLimit := container.Resources.Limits.Cpu()
	memoryLimit := container.Resources.Limits.Memory().Value()
	oomScoreAdj := int64(qos.GetContainerOOMScoreAdjust(pod, container, int64(m.machineInfo.MemoryCapacity)))

	if cpuRequest.IsZero() && !cpuLimit.IsZero() {
		cpuShares = milliCPUToShares(cpuLimit.MilliValue())
	} else {
		// if cpuRequest.Amount is nil, then milliCPUToShares will return the minimal number
		// of CPU shares.
		cpuShares = milliCPUToShares(cpuRequest.MilliValue())
	}
	lc.Resources.CpuShares = cpuShares
	if memoryLimit != 0 {
		lc.Resources.MemoryLimitInBytes = memoryLimit
	}

	lc.Resources.OomScoreAdj = oomScoreAdj

	if m.cpuCFSQuota {
		cpuPeriod := int64(quotaPeriod)
		if utilfeature.DefaultFeatureGate.Enabled(kubefeatures.CPUCFSQuotaPeriod) {
			cpuPeriod = int64(m.cpuCFSQuotaPeriod.Duration / time.Microsecond)
		}
		cpuQuota := milliCPUToQuota(cpuLimit.MilliValue(), cpuPeriod)
		lc.Resources.CpuQuota = cpuQuota
		lc.Resources.CpuPeriod = cpuPeriod
	}

	lc.Resources.HugepageLimits = GetHugepageLimitsFromResources(container.Resources)

	return lc
}
containerConfig 生成之后,再调用 CRI 的接口创建 container,其中包括 container 级别的 cgroup 创建。
OOM 打分
众所周知,当节点内存不足时,会触发系统的 OOM Killer,而不同 QoS 类型的 pod,kubelet 必须保证 kill 的顺序不同,下面我们就来看看 kubelet 如何保证 pod 被 kill 的顺序。
Linux OOM
Linux 有一种 OOM KILLER 的机制,它会在系统内存耗尽的情况下,启用自己算法有选择性的杀掉一些进程。跟系统 OOM 有关的几个文件:
/proc/<pid>/oom_score_adj:在计算最终的 badness score 时,会在计算结果是中加上 oom_score_adj,这样用户就可以通过该在值来保护某个进程不被杀死或者每次都杀某个进程,其取值范围为 -1000 到 1000。如果将该值设置为-1000,则进程永远不会被杀死,因为此时 badness score 永远返回 0。
/proc/<pid>/oom_adj:该设置参数的存在是为了和旧版本的内核兼容。其设置范围为-17到15。
/proc/<pid>/oom_score:这个值是系统综合进程的内存消耗量、CPU时间(utime + stime)、存活时间(uptime - start time)和oom_adj计算出的。
OOM killer 机制主要根据 oom_score 和 oom_score_adj 来决定杀死哪一个进程。
kubelet 的 OOM 打分系统
有了 OOM Killer 的基础,我们再来看下 kubelet 是怎么给不同种类的进程设置的 oom_score_adj。从代码中收集如下:
dockerOOMScoreAdj = -999
KubeletOOMScoreAdj int = -999
KubeProxyOOMScoreAdj  int = -999
defaultSandboxOOMAdj int = -998
guaranteedOOMScoreAdj int = -998
besteffortOOMScoreAdj int = 1000
dockershim 进程(dockerOOMScoreAdj)、kubelet 进程(KubeletOOMScoreAdj)、kubeproxy 进程(KubeProxyOOMScoreAdj),oom_score_adj 设置成了 -999,表明十分重要,但没有到 -1000。
pod pause 容器(defaultSandboxOOMAdj)以及 Guaranteed 类型的 pod(guaranteedOOMScoreAdj),oom_score_adj 设置成了 -998,表明也很重要,但相对上面那些组件,这些还是可以 kill 的。
而 BestEffort 类型的 pod(besteffortOOMScoreAdj) ,oom_score_adj 设置成了 1000,也就说明了 BestEffort 类型的 Pod 是最容易被 kill 掉的。
最后再来看下 Burstable 类型 的 pod,它的计算公式是:
min{max[1000 - (1000 * memoryRequest) / memoryCapacity, 1000 + guaranteedOOMScoreAdj], 999}
可以看出 Burstable 类型的 pod,得分一定比 Guaranteed 大,比 BestEffort 小,并且 memory 的 request 值越大,则越不容易被 kill。源码如下:
👉 点击查看源码
func GetContainerOOMScoreAdjust(pod *v1.Pod, container *v1.Container, memoryCapacity int64) int {
	if types.IsCriticalPod(pod) {
		// Critical pods should be the last to get killed.
		return guaranteedOOMScoreAdj
	}

	switch v1qos.GetPodQOS(pod) {
	case v1.PodQOSGuaranteed:
		// Guaranteed containers should be the last to get killed.
		return guaranteedOOMScoreAdj
	case v1.PodQOSBestEffort:
		return besteffortOOMScoreAdj
	}

	memoryRequest := container.Resources.Requests.Memory().Value()
	oomScoreAdjust := 1000 - (1000*memoryRequest)/memoryCapacity
	// A guaranteed pod using 100% of memory can have an OOM score of 10. Ensure
	// that burstable pods have a higher OOM score adjustment.
	if int(oomScoreAdjust) < (1000 + guaranteedOOMScoreAdj) {
		return (1000 + guaranteedOOMScoreAdj)
	}
	// Give burstable pods a higher chance of survival over besteffort pods.
	if int(oomScoreAdjust) == besteffortOOMScoreAdj {
		return int(oomScoreAdjust - 1)
	}
	return int(oomScoreAdjust)
}
总结
总的来说,k8s 中提供了三类的 QoS,分别是 Guaranteed,Burstable 和 BestEffort,kubelet 为不同类型的 pod 创建了不同的 cgroups,从而保证不同类型的 pod 获得的资源不同,尽量保证高优先级的服务质量,提升系统稳定性。