
本文基于 Argo v2.7.6,Kubernetes v1.18
Argo 是一个基于 Kubernetes CRD 实现的工作流引擎,为 Kubernetes 提供了 container-native 工作流,即每个工作流节点都是以容器为单位,跑一个任务。
安装
既然是基于 Kubernetes CRD 实现的,那它的组成也就是 CRD + Controller。安装 Argo 很简单,只需要创建一个 argo namespace 和 apply 一个官方提供的 yaml 即可:
kubectl create namespace argo
kubectl apply -n argo -f https://raw.githubusercontent.com/argoproj/argo/stable/manifests/install.yaml
安装好后可以看到 K8s 集群中安装了几个 CRD 和一个 Controller 及其 RBAC 资源。
除了使用 kubectl 来使用 argo workflow 之外,还可以使用 argo cli。在 Mac 环境下安装:
brew install argoproj/tap/argo
在 Linux 环境下安装:
# Download the binary
curl -sLO https://github.com/argoproj/argo/releases/download/v2.7.6/argo-linux-amd64

# Make binary executable
chmod +x argo-linux-amd64

# Move binary to path
mv ./argo-linux-amd64 /usr/local/bin/argo

# Test installation
argo version
工作原理
然后我们先来看 Argo 的工作原理。
架构
Argo 官网提供了一个 v2.5 版本之后的 Argo 架构图,如下:
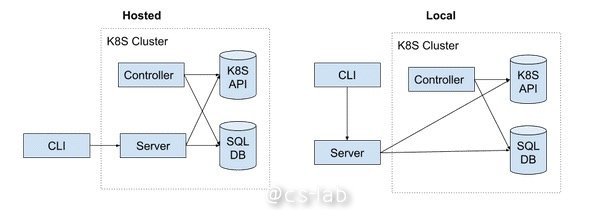
argo server 向 argo cli 提供 api 服务,当接收到 argo cli 的请求, argo server 会调用 K8s Api 来操作资源;而 Controller 来响应 CRD 的资源变化。
argo server
argo server 分 Hosted 和 Local 两种模式。二者区别在于 Hosted 模式的 server 运行在 K8s 集群内部,而 Local 模式的 server 运行在 K8s 集群外部(大多数情况是运行在本地)。
本地启动 argo server:
$ argo server
INFO[0000]                                               authMode=server baseHRef=/ managedNamespace= namespace=default
INFO[0000] config map                                    name=workflow-controller-configmap
INFO[0000] Starting Argo Server                          version=v2.7.6+70facdb.dirty
INFO[0000] Argo Server started successfully on address :2746
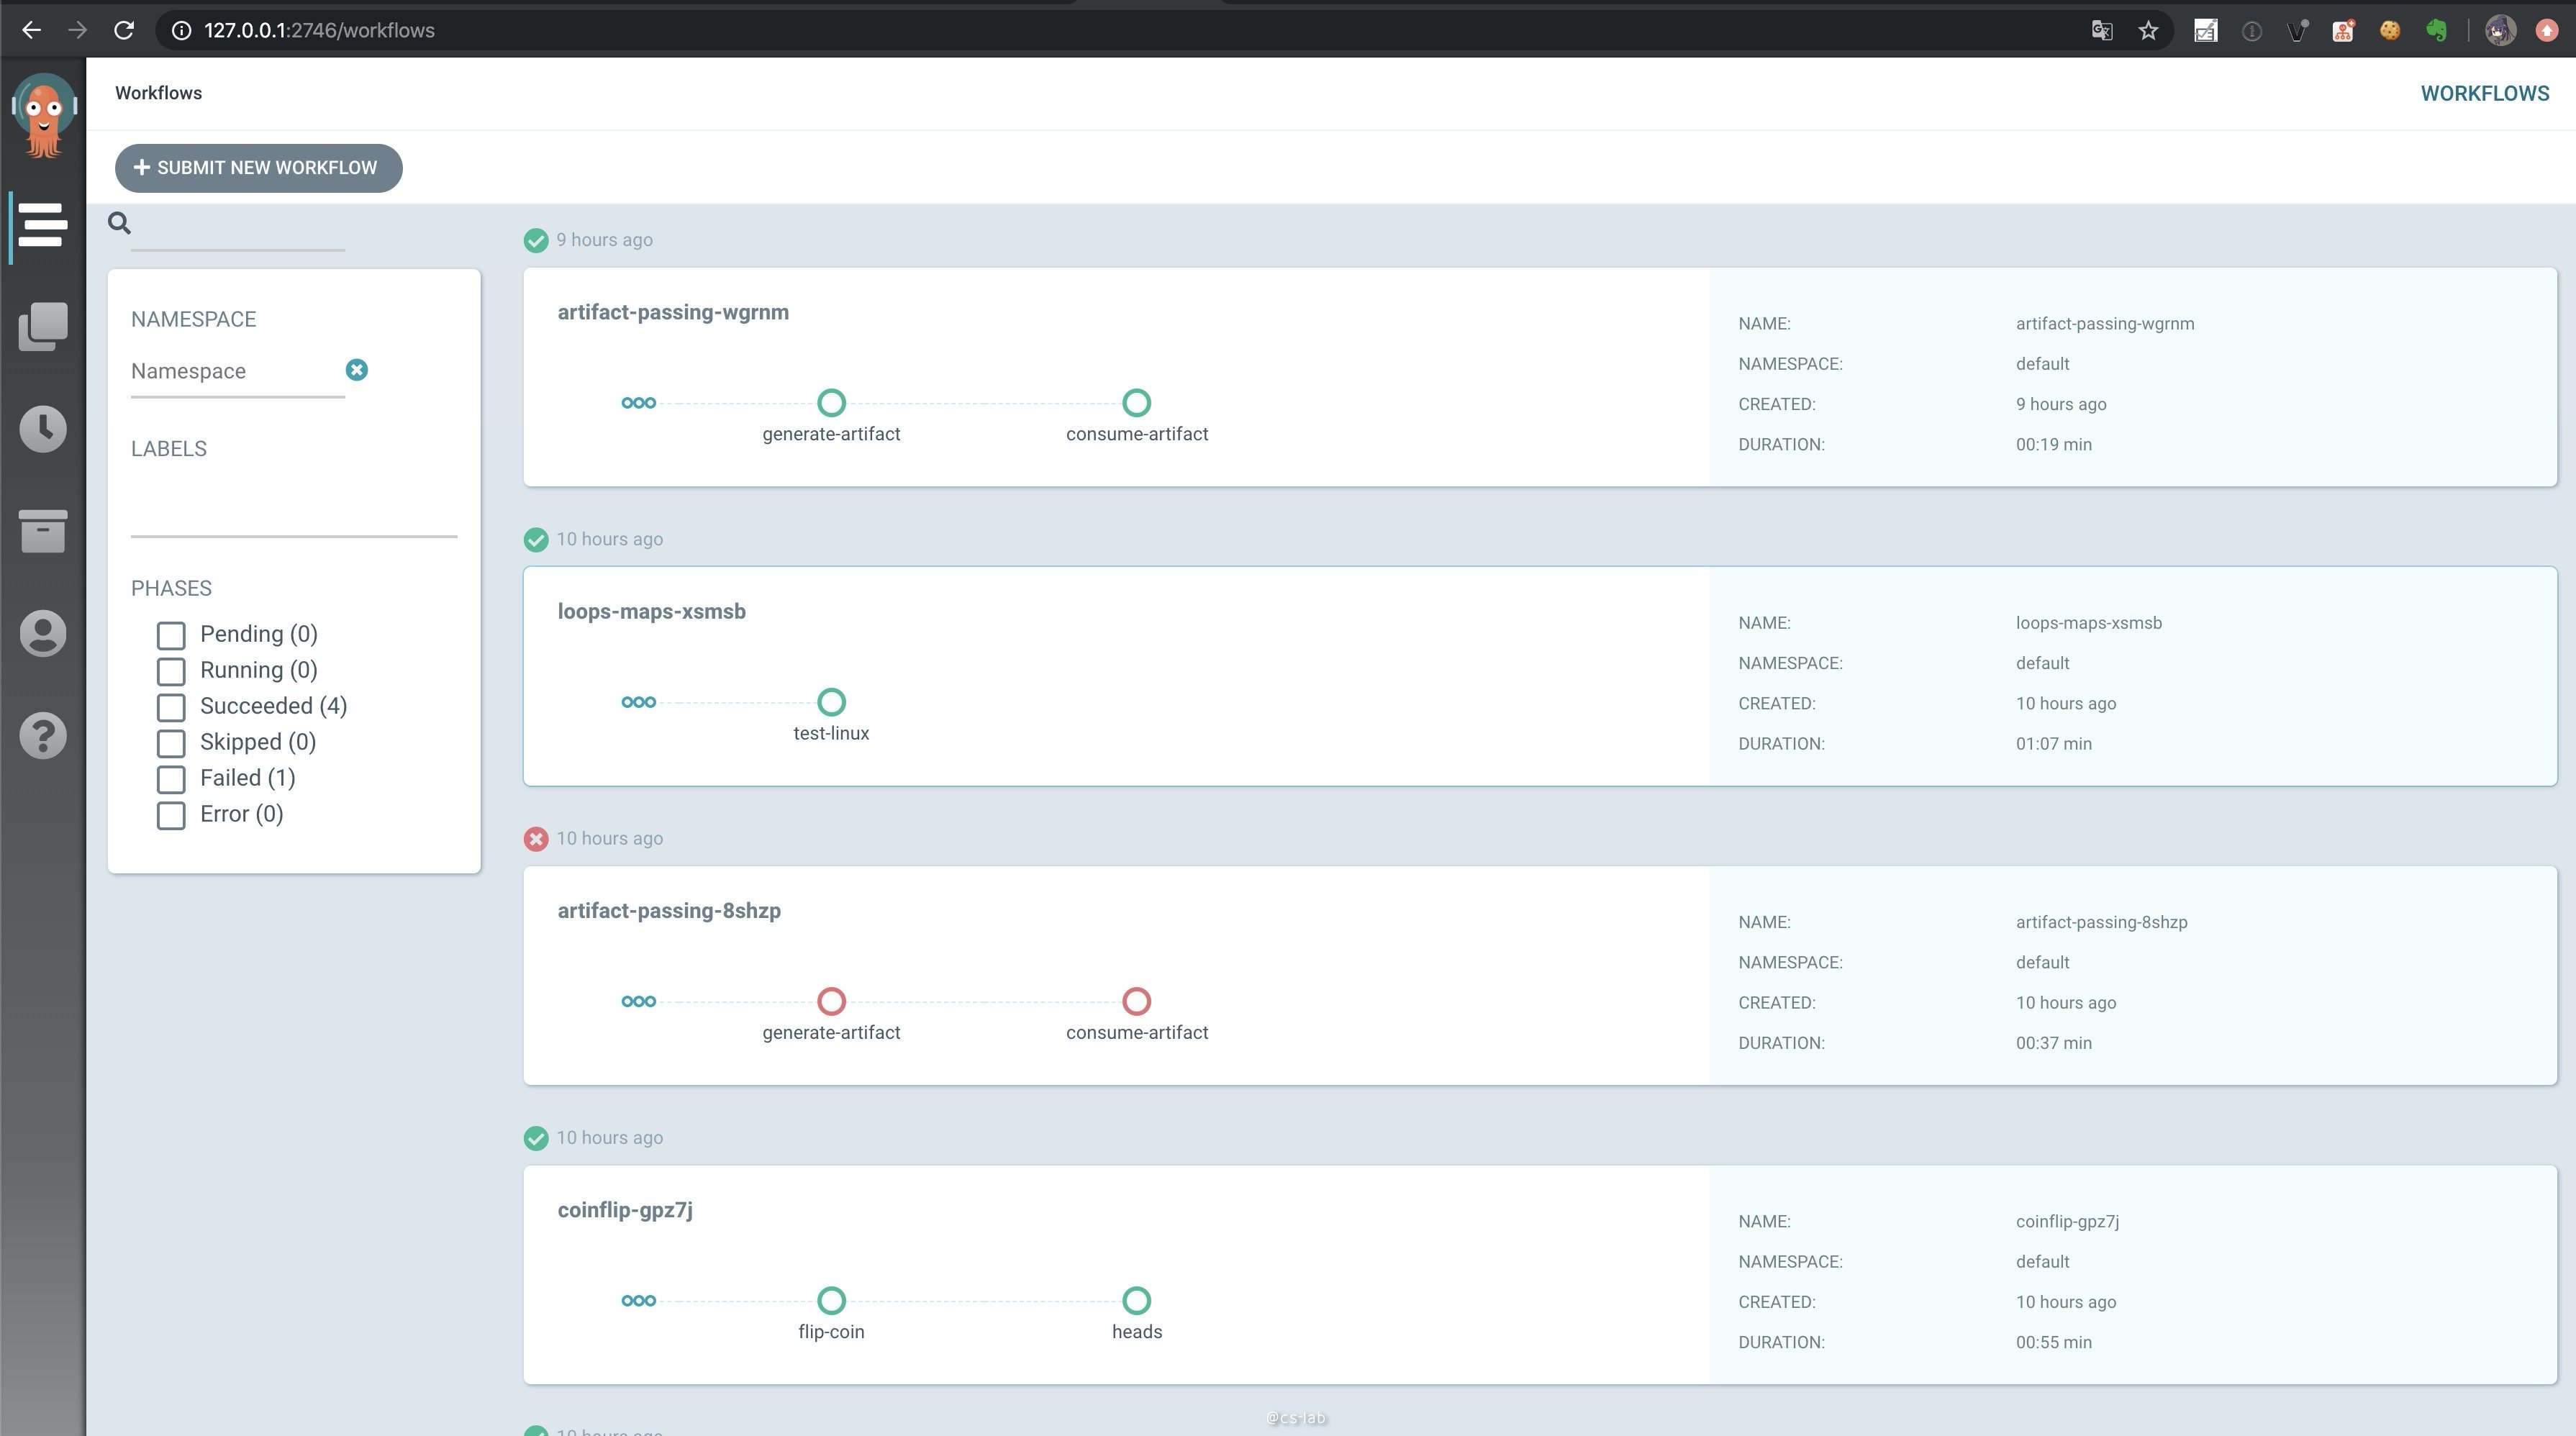
启动完毕后访问本地的 2746 端口,可以看到一个 Argo server 提供的 ui 界面:
Workflow
Argo 最重要的一个 CRD 就是 Workflow,先看下其 Spec 定义:
type WorkflowSpec struct {
	// Templates is a list of workflow templates used in a workflow
	// +patchStrategy=merge
	// +patchMergeKey=name
	Templates []Template `json:"templates" patchStrategy:"merge" patchMergeKey:"name" protobuf:"bytes,1,opt,name=templates"`

	// Entrypoint is a template reference to the starting point of the workflow.
	Entrypoint string `json:"entrypoint,omitempty" protobuf:"bytes,2,opt,name=entrypoint"`

	// Arguments contain the parameters and artifacts sent to the workflow entrypoint
	// Parameters are referencable globally using the 'workflow' variable prefix.
	// e.g. {{workflow.parameters.myparam}}
	Arguments Arguments `json:"arguments,omitempty" protobuf:"bytes,3,opt,name=arguments"`

	...
}
其中最重要的三个参数:
Templates:所有的工作流模板定义;
Entrypoint:工作流模板入口,也就是指定一个模板 name,指明该 workflow 从哪个模板开始;
Arguments:可以定义 workflow 的入参和制品信息,如果参数使用了 'workflow' 的前缀,表示为整个 workflow 全局可以用。
Template
再来看下 Template 的定义:
// Template is a reusable and composable unit of execution in a workflow
type Template struct {
	// Name is the name of the template
	Name string `json:"name" protobuf:"bytes,1,opt,name=name"`

	// Inputs describe what inputs parameters and artifacts are supplied to this template
	Inputs Inputs `json:"inputs,omitempty" protobuf:"bytes,5,opt,name=inputs"`

	// Outputs describe the parameters and artifacts that this template produces
	Outputs Outputs `json:"outputs,omitempty" protobuf:"bytes,6,opt,name=outputs"`

	// Metdata sets the pods's metadata, i.e. annotations and labels
	Metadata Metadata `json:"metadata,omitempty" protobuf:"bytes,9,opt,name=metadata"`

	// Steps define a series of sequential/parallel workflow steps
	Steps []ParallelSteps `json:"steps,omitempty" protobuf:"bytes,11,opt,name=steps"`

	// Container is the main container image to run in the pod
	Container *apiv1.Container `json:"container,omitempty" protobuf:"bytes,12,opt,name=container"`

	...
}
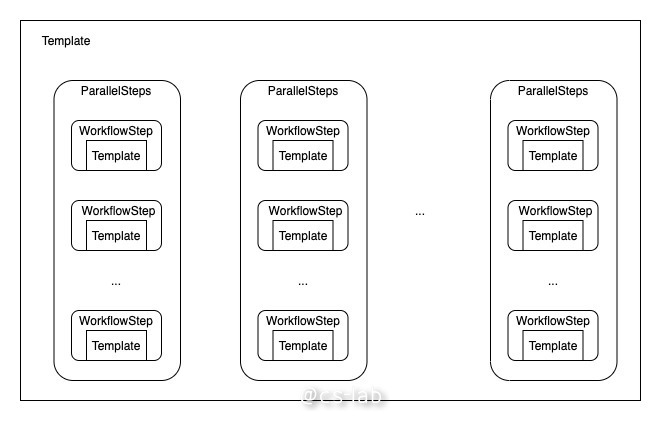
可以看到,Template 在整个 workflow 中是可以被复用的。几个重要的参数有输入输出 Inputs、Outputs;该模板运行的 pod 的元数据 Metadata;模板运行的 Container 的定义;模板中定义的并行 Steps 等。
一个 workflow 可以定义一个入口模板(Entrypoint 指定)。其中 Template 和 Step 的关系如下图所示,而模板中可以定义多个并行的 Step,从而构成一个工作流;而 Step 中又可以引用其他模板,每个模板运行一个 pod 进行工作。
Step
再来看下 Step 的定义:
type ParallelSteps struct {
	Steps []WorkflowStep `protobuf:"bytes,1,rep,name=steps"`
}

// WorkflowStep is a reference to a template to execute in a series of step
type WorkflowStep struct {
	// Name of the step
	Name string `json:"name,omitempty" protobuf:"bytes,1,opt,name=name"`

	// Template is the name of the template to execute as the step
	Template string `json:"template,omitempty" protobuf:"bytes,2,opt,name=template"`

	// Arguments hold arguments to the template
	Arguments Arguments `json:"arguments,omitempty" protobuf:"bytes,3,opt,name=arguments"`

	// WithItems expands a step into multiple parallel steps from the items in the list
	WithItems []Item `json:"withItems,omitempty" protobuf:"bytes,5,rep,name=withItems"`

	...
}
ParallelSteps 中包含了一组 WorkflowStep,形成并行的 Step;WorkflowStep 引用一个模板,模板中可以再指定 ParallelSteps,有了这种串并行的 Step,Argo 就实现了任意形式的工作流的自定义功能。
Step 中的 Arguments 也是可以设置该 Step 中的入参及制品信息;WithItems 则将一个 Step 扩展到多个并行 Step。
上手使用
了解了 Argo 的工作原理之后,我们来实践一下,先使用一个 Argo 官网提供的一个例子:
argo submit --watch https://raw.githubusercontent.com/argoproj/argo/master/examples/loops-maps.yaml
先看下 Workflow 的 yaml 定义:
apiVersion: argoproj.io/v1alpha1
kind: Workflow
metadata:
  generateName: loops-maps-
spec:
  entrypoint: loop-map-example
  templates:
  - name: loop-map-example
    steps:
    - - name: test-linux
        template: cat-os-release
        arguments:
          parameters:
          - name: image
            value: "{{item.image}}"
          - name: tag
            value: "{{item.tag}}"
        withItems:
        - { image: 'debian', tag: '9.1' }
        - { image: 'debian', tag: '8.9' }
        - { image: 'alpine', tag: '3.6' }
        - { image: 'ubuntu', tag: '17.10' }

  - name: cat-os-release
    inputs:
      parameters:
      - name: image
      - name: tag
    container:
      image: "{{inputs.parameters.image}}:{{inputs.parameters.tag}}"
      command: [cat]
      args: [/etc/os-release]
Worflow 的入口模板为 loop-map-example;该模板定义了四个并行执行的 Step,其执行参数是分别输入的。
由于打开了 watch 接口,我们可以在终端看到该 workflow 的运行情况:
Name:                loops-maps-qzv56
Namespace:           default
ServiceAccount:      default
Status:              Succeeded
Created:             Tue May 05 03:42:58 +0800 (4 seconds ago)
Started:             Tue May 05 03:42:58 +0800 (4 seconds ago)
Finished:            Tue May 05 03:43:02 +0800 (now)
Duration:            4 seconds

STEP                                         TEMPLATE          PODNAME                      DURATION  MESSAGE
 ✔ loops-maps-qzv56                          loop-map-example
 └-·-✔ test-linux(0:image:debian,tag:9.1)    cat-os-release    loops-maps-qzv56-2106556403  2s
   ├-✔ test-linux(1:image:debian,tag:8.9)    cat-os-release    loops-maps-qzv56-2252793177  3s
   ├-✔ test-linux(2:image:alpine,tag:3.6)    cat-os-release    loops-maps-qzv56-3723288758  3s
   └-✔ test-linux(3:image:ubuntu,tag:17.10)  cat-os-release    loops-maps-qzv56-3710784351  2s
在 Argo UI 中可以直观的看到 workflow 的运行情况: